Orders
Managing Orders
Customer orders are managed from the Orders page, which is accessed from the Orders>Orders menu on your Admin panel.
The Orders page is where orders are fulfilled and shipped. It is also where refunds are processed.
The Orders page shows a list of all your customer orders, regardless of shipping status, sorted by descending order. The order number, date/time the order was posted, customer name, amount, payment status, and shipping status are displayed on the list.
Clicking an order on the list opens the Order Details page, where more information about the order is displayed.
- Filtering Orders
- Processing an Order
- Processing a Refund
- Editing a Customer's Details
- Analyzing Risks in Orders
Filtering Orders
By default, the Orders page displays all customer orders, regardless of status. The orders are sorted by descending order. with the latest order on your store showing first. You can apply a filter on the Orders page to display only certain orders.
To Filter Orders
- On your Admin panel, click Orders>Orders.
- On the Orders page, click the All Orders link at the top.
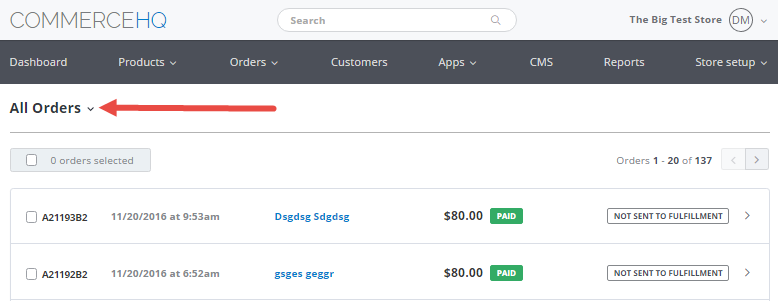
Click All Orders to bring down the Orders filter
- Filter your orders by shipping status, date range, order number, or customer name. You may enter one or more terms in each of these fields.
- Click Refine View. The orders that meet the filter criteria you entered in Step 3 above are then displayed on the screen.
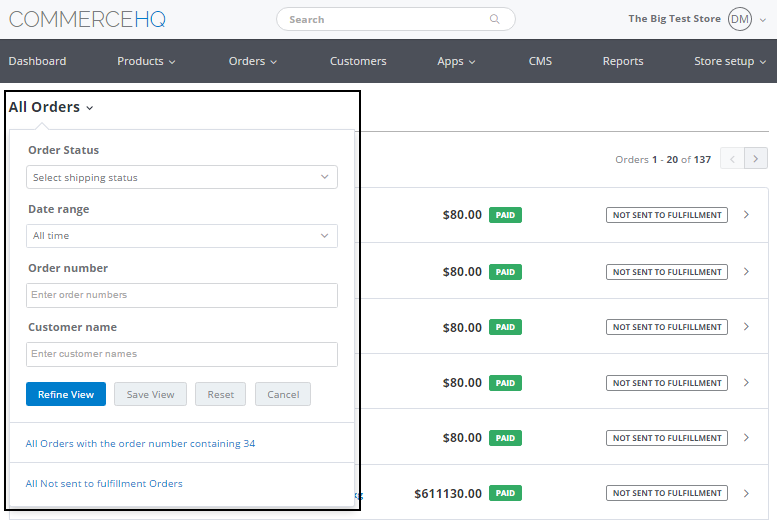
Enter your filter criteria, then click Refine View
To Reset a Filter
Click Reset to reset the filter to the default All Orders view.
To Save a View
Views of orders to which filters have been applied can be saved. These saved views can then be used to filter the Orders page in the future.
- Filter the Orders Page (see To Filter Orders).
- Click Save View to add to your list of saved views.
To Run a Saved View
- Click the All Orders link at the top of the Orders page.
- Click a saved view from your list of saved views.
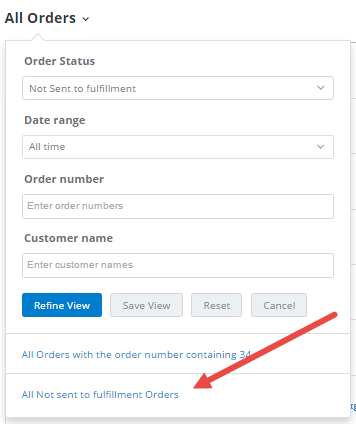
Click a saved view from the list
In the above example, clicking All Not sent to fulfillment Orders on the Saved View list
applies the filter and shows ONLY all Not sent to fulfillment orders on the Orders page.
Processing an Order
There are three stages in the order process:
- Not sent to fulfillment
- Sent to fulfillment
- Shipped
We will go through these stages in this section.
NOTE:
Since all orders are assumed to have been paid for online, all orders have payment status set to "Paid," although this may change later on to "Partially Refunded", when part of the payment for an order is partially refunded, or "Refunded", when the payment is refunded in full.
- To Open a Not Sent for Fulfillment Order
- To Send a Single Order for Fulfillment
- To Send Multiple Orders for Fulfillment
- To Ship a Single Order
- To Ship Multiple Orders
- To View Tracking Numbers of Shipped Orders
- To Revert an Order Back to a Previous Stage
To Open a Not Sent for Fulfillment Order
- On your Admin panel, click Orders>Orders.
- On the Orders page, the latest order on your store is the first one displayed on the list. Click the order.
You may apply a filter so that only the records you want to work on will be displayed on the page (see To Filter Orders).
In this particular instance, since we will be going through the entire order process, we will start with orders that have their shipping status as "Not sent to fulfillment," or those orders that have yet to be forwarded on to your fulfillment centers.
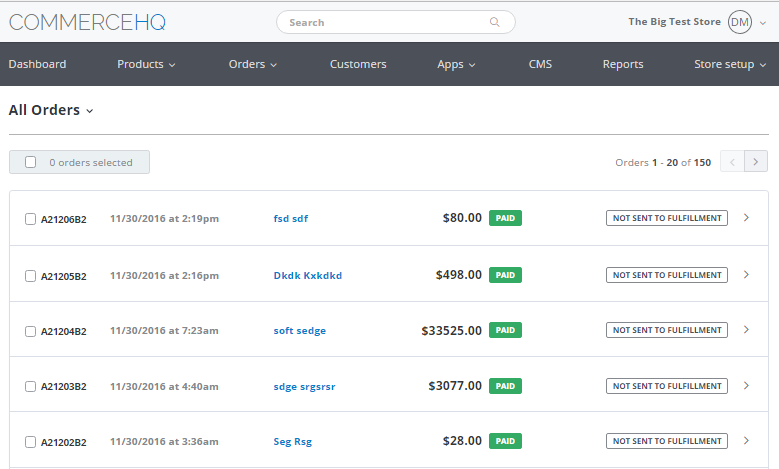
The Orders Page
To Send a Single Order for Fulfillment
After opening a Not Sent for Fulfillment order, the first thing you need to do is to send the item for fulfillment.
- On the Order Details page of a Not Sent for Fulfillment order, you can either mark all the items, or select one or more items, in the order as Sent. To mark all items, go to Step 2. Otherwise, skip to Step 3.
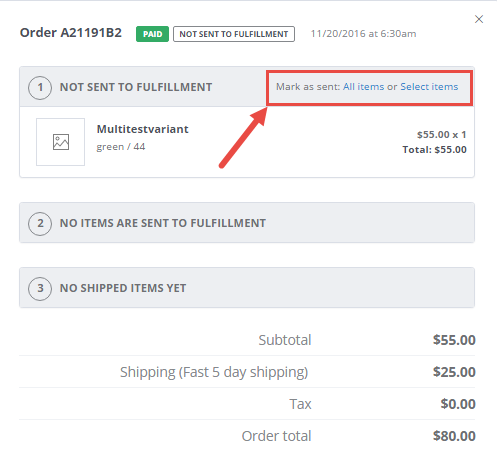
Click either mark all items as sent or select items for marking
- To mark all items in the order as Sent, click the All Items link, then click Mark. Skip to Step 4.

Click Mark to select all items as Sent to fulfillment
- To mark one or more items in the order as Sent, click Select items, check the boxes to the left of the items to be sent for fulfillment from the list, then click Mark.

Check the order, then click Mark to send items for fulfillment
- The first stage gets checked, then the items are sent to the next stage: Sent to Fulfillment.
To Send Multiple Orders for Fulfillment
On the Orders page with all products showing on the list:
- Check two or more order transactions that are tagged as "Not Sent to fulfillment" or "Sent to fulfillment." You may also choose all order transactions by checking the box on the top-leftmost.
- Select an action (Mark as sent to fulfillment, Mark as Shipped, or Export to Template) from the list.
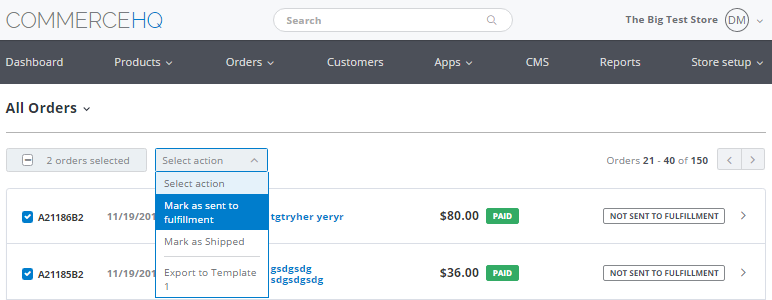
Select two or more orders, go to the Actions box, then click Mark as sent to fulfillment
To Ship a Single Order
On the Sent to Fulfillment stage of the Order Details page, the same process detailed in To Send an Item for Fulfillment is repeated, except that this time, the items are being sent for shipment, rather than fulfillment.
- On the Order Details page of a Sent to Fulfillment order, you can either mark all the items, or select one or more items, in the order as Sent. To mark all items, go to Step 2. Otherwise, skip to Step 3.
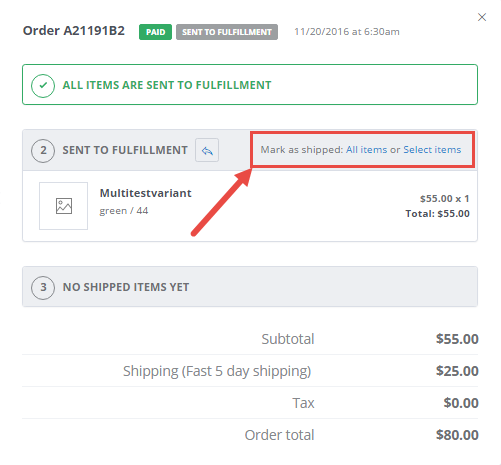
Click either mark all items as sent or select items for marking
- To mark all items in the order as Sent, click the All Items link, then enter a tracking number for the order and select a shipping carrier from the list. You can also check the Send notification box at the bottom, if you want to send a notification to the customer that the order has been forwarded for shipment. Skip to Step 4.
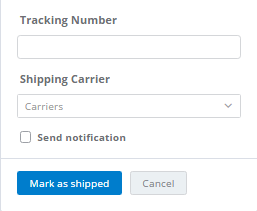
Enter a tracking number, select a shipping carrier, and check the Send notification box
- To mark one or more items in the order as Sent, click Select items, check the boxes to the left of the items to be shipped from the list, enter a tracking number for the order, select a shipping carrier from the list, then click Mark.

Enter a tracking number, then select a carrier
- The second stage gets checked, then the items are sent to the next stage: Shipped.
To Ship Multiple Orders
On the Orders page, with all products showing on the list:
- Check two or more order transactions that are tagged as "Sent to fulfillment." You may also choose all order transactions by checking the box on the top-leftmost.
- Select an action (Mark as Shipped, or Export to Template) from the list.
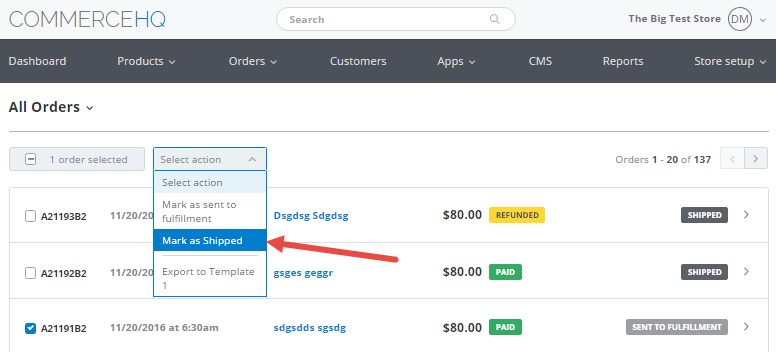
Select two or more orders, go to the Actions box, then click Mark as Shipped
To View Tracking Numbers of Shipped Orders
Shipped items in an order are listed under the Shipped stage. To view the tracking number/s for the order, click the View Tracking Numbers link at the top right.
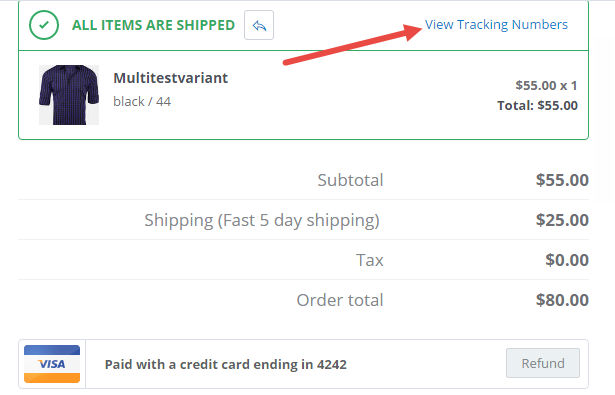
Click View Tracking Numbers to display an order's tracking number/s
To Revert an Order Back to a Previous Stage
At any time throughout the three above-mentioned stages, an order may be reverted back to the prior stage. For example, in case an order cannot be fulfilled because of unavailable stock, you can send a Sent for Fulfillment order back to Not Sent to Fulfillment. Then, when stock becomes available, you can mark it again as Sent to Fulfillment.
- Click the Revert, or reverse arrow, icon on the current stage. Thus, if an order is currently under "Shipped" stage, to revert it back to the previous "Sent for Fulfillment" stage, click the Revert icon that can be seen on the Shipped stage section of the Order Details page.

Click the reverse arrow icon to revert the order back to the previous stage
- On the window that is displayed when you click the Revert icon, select the order/s to be unmark as Shipped, then click Unmark to revert back the order from Shipped to Sent to Fulfillment.
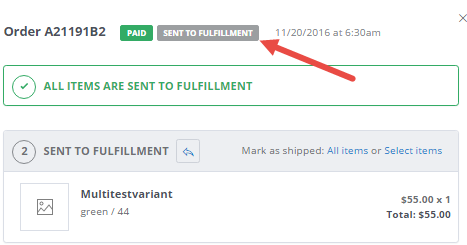
The stage gets reversed from Shipped to Sent to Fulfillment
Processing Refunds and Returns
Orders can be refunded for any number of reasons. For example, if a product runs out of stock and the customer cannot wait until the product becomes available again, you may refund the order instead. Another example would be customers not satisfied with what they bought, and asking for a refund.
Orders retain their shipping status at the time they are refunded. For example, shipped orders that are refunded will have payment status set to Refunded but retain their Shipped status.
To Process a Full Refund
- On your Admin panel, click Orders>Orders.
- On the Orders page, look for the order to be refunded, then click the order.
- Click Refund.
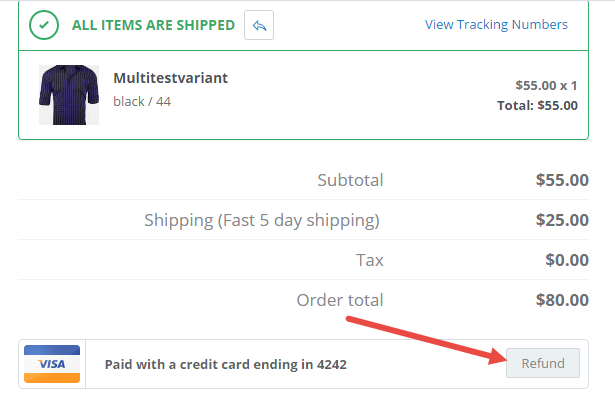
Click Refund to bring up the Issue a Refund window
- On the Issue a Refund window, the full amount of the order is displayed as Available for Refund by default.
To notify the customer about the refund, check the Send notification email to customer box.
To refund the full amount, click the Refund button.
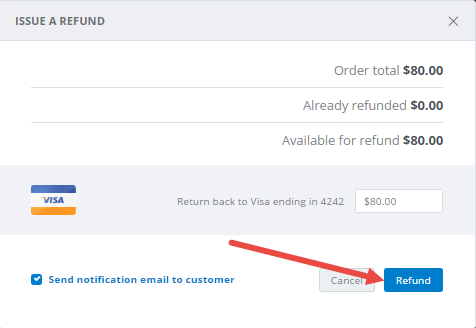
Click Refund to refund the full amount
- Back on the Order Details page, the payment status is changed from Paid to Refunded, and the Net Payment amount is set to 0.
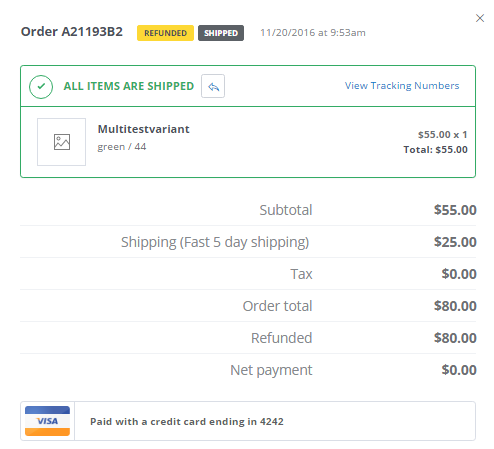
The Order Details page, after a Full Refund
To Partially Refund an Order
- On your Admin panel, click Orders>Orders.
- On the Orders page, look for the order to be refunded, then click the order.
- Click Refund.
- On the Issue a Refund window, enter the amount to be refunded, then click Refund.
To notify the customer about the refund, check the Send notification email to customer box.
At the top of the order details, the payment status is changed from Paid to Partially Refunded, and the Net Payment amount is set to Order Total - Amount Refunded.
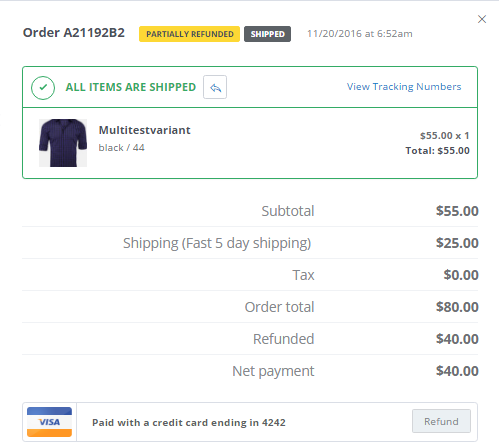
The Order Details page, after a Partial Refund.
To Restock a Returned Item
In the case of customers returning items for refund, you may put the returns back to your inventory through the Restock option.
- On your Admin panel, click Orders>Orders.
- On the Orders page, look for the order to be refunded, then click the order.
- Click Refund.
- On the Refund window, enter the amount to be refunded, then check the Restock Items box.
- Enter the number of items to be restocked, then click Refund & Restock. At the top of the order details, the payment status is changed from Paid to either Refunded or Partially Refunded, depending on whether the full amount of the order was refunded or not.
NOTE
You must be using CommerceHQ's inventory tracking feature to use the Restock option on a customer's returned items.
Editing a Customer's Details
The customer's email address, shipping and billing address, and contact telephone number are available for editing from the Order Details page. This ensures that the required customer information for successful fulfillment of the order is updated prior to shipping, in case there are updates to the customer information from the time the order was placed.
To edit the customer information, click the Edit button to the right of each field on the Customer record, enter the updated information, then click Save.
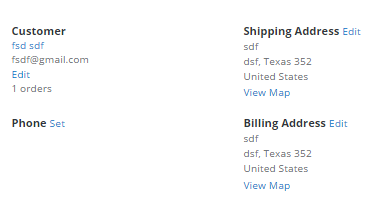
The Customer's Contact Details
Analyzing Risks in Orders
When a customer places an order on your store, CommerceHQ analyzes the transaction for risk markers, depending on the payment method used by the customer.
Risks in Credit Card Purchases
If the customer uses a credit card for paying for the order, the following risk markers are considered:
- Location of customer's IP address must match the country indicated in the customer's billing address.
- Customer's billing address must match the one associated with the card.
- The zip or postal code in the customer's billing address must match the one associated with the card.
- The card verification value (CVV) of the customer's credit card must be correct.
Risks in PayPal Transactions
If the customer uses PayPal to pay for the transaction, the following risk markers are considered:
- Location of customer's IP address must match the country indicated in the customer's billing address.
- The customer's confirmed PayPal address must be the same as the customer's billing address
Types of Risk
The order transaction's risk is adjudged the following based on the results of the risk markers:
- Low Risk: when all checks are successful
- Medium Risk: when one (1) is unsuccessful
- High Risk: when two or more checks are unsuccessful
The risk for an order transaction is indicated on the Order Details page.
If you see an order marked as a medium-risk or high-risk transaction, you should consider cancelling the transaction altogether to avoid potential chargeback claims on the transaction.
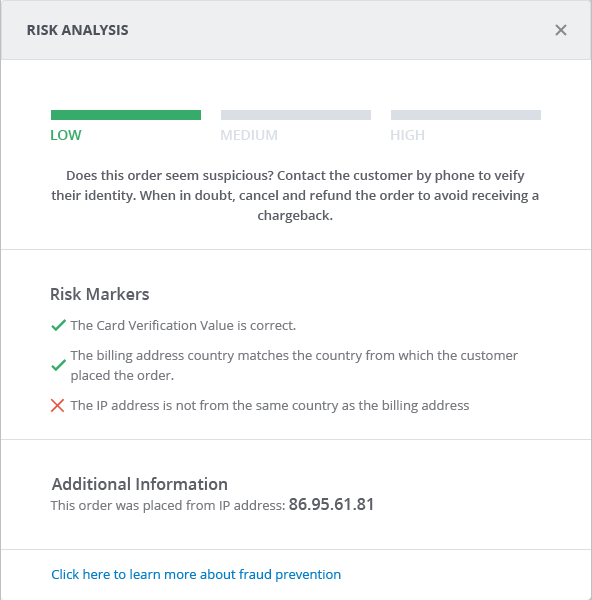
The Risk Analysis section of a Customer's Order
Printing an Order
You can print the order for record purposes. For example, you might want to print the order details for your fulfillment partner or shipping carrier.
- On the Order Details page, click Print Order.
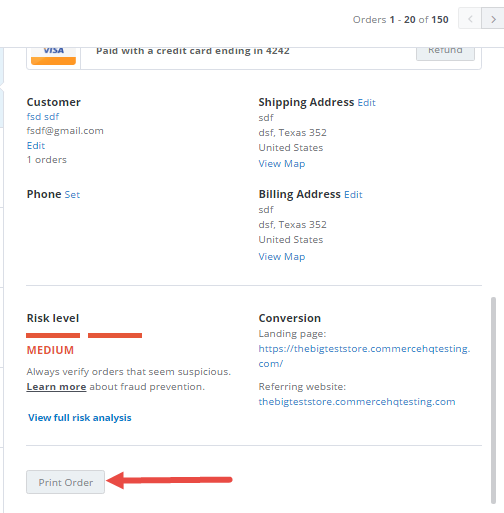
Click Print Order
- Press Ctrl+P on your keyboard to bring up the Print dialog box that you can use for printing the order.
Updated almost 7 years ago
