Managing Products
Managing Products
Products are added to your store through the Add a Product page, which is accessible via Products>Add a Product on your Admin panel.
Products are classified as either single-variant or multi-variant. Single-variant products are available as-is and without any variations. On the other hand, multi-variant products are available in different variations.
For example, a free-size shirt that is available in only one color is a single-variant product. If the shirt also comes in small, medium, and large sizes, and is available in black as well, the shirt becomes a multi-variant product.
Some of the fields available for input on the Add a Product page is set up from the Store setup>Product page.
Products can be grouped into collections that you can showcase on your storefront. For more details, see Collections.
- Adding a Single Variant Product
- Adding a Multi Variant Product
- Adding and Deleting Product Variations
- Creating and Using a Product Template
- Filtering Products
- Editing a Product
- Saving a Product as Draft
- Publishing a Draft Product
- Unpublishing a Product
- Deleting a Product
Adding a Single-Variant Product
Single-variant products are available as-is, without any variations.
- On your Admin panel, click Products>Add a Product.
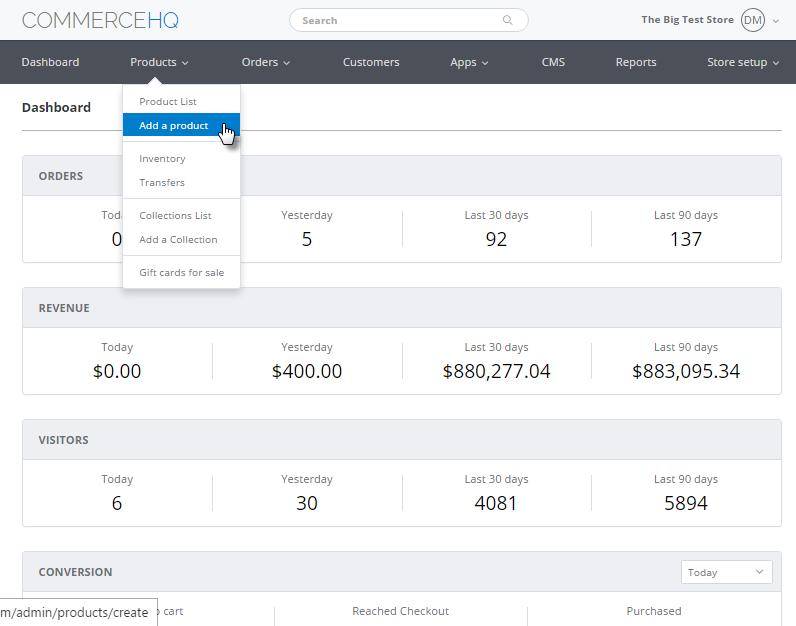
Click Products, then Add a Product
Alternatively, click Products>Product List, then click the Add a Product button on the topmost right of your Product List.
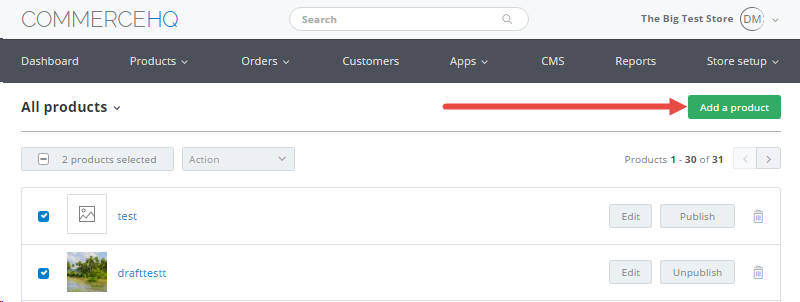
Click Add a product from the Product List
- On the Add a product page, Single Variant is selected by default.
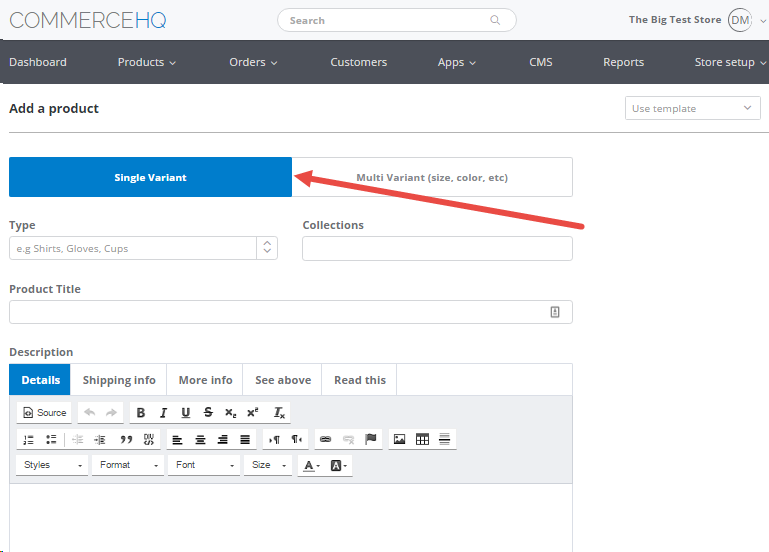
The Single Variant tab
- Enter the product type.
- Enter one or more collections to which the product will belong to when shown on your storefront. Products can be included in one or more collections. For more details, see Collections.
- Enter the product title and item price.
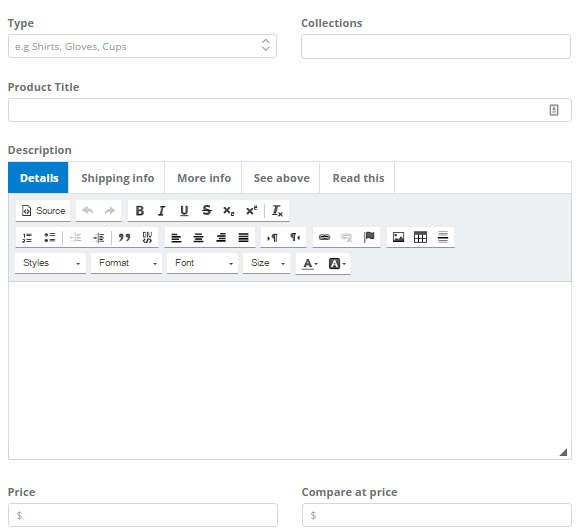
Enter the collection, product title and item price
- By default, fulfillment service is set to manual shipment fulfillment. You may change this to automatic shipment fulfillment, if desired.
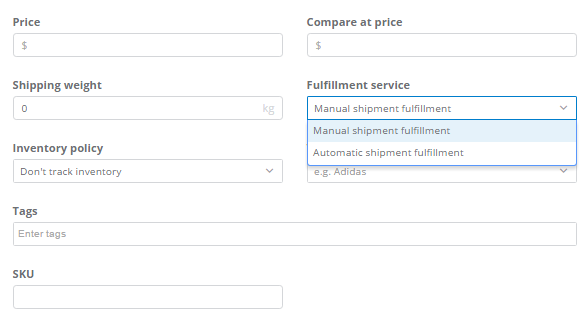
Select the fulfillment service
- By default, inventory policy is set to don't track inventory. You may change this to track inventory, if desired.

Select the inventory policy
- To help improve the product's SEO rankings, under the SEO section at the bottom of the Add a Product page, you may edit the page title, which defaults to the product title. You can also edit the URL and handle (which are automatically generated from the product title), and enter an optional meta description.
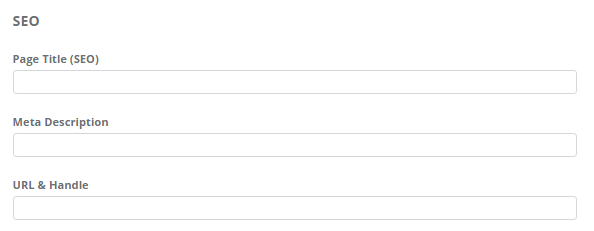
The SEO section of the Add a Product page
- Although the other fields are optional, we recommend that, at the very least, you enter a product description and upload product images to attract potential customers.
Remember that the more your customers can visualize the actual product, the higher the chances of purchase.
The tabs under the Descriptions box are set up under Store setup>Products. Use the rich text editor to format the text for the descriptions any way you want. You can even use HTML for your descriptions.
For more details on uploading images, see Uploading a Product Image.
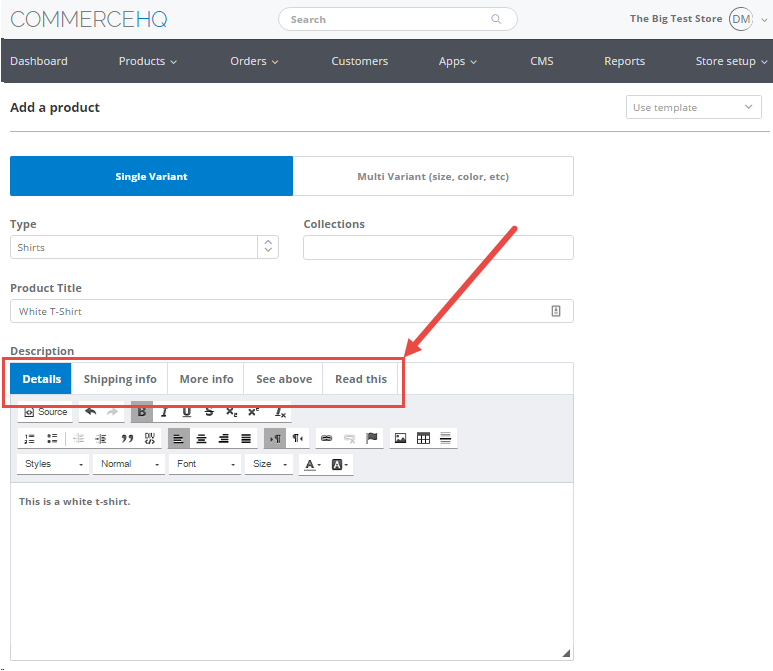
The various tabs under Descriptions are set up under Store Setup>Product page
Rich Text Editor for Product Descriptions
CommerceHQ features a rich text editor for entering your product descriptions on the Add a Product page. This allows you to be as creative as you like when entering your descriptions.
- If you are adding more products, check the Create another box, then click either Publish or Save draft to save your changes. A message appears after a successful save. The Add a product page then refreshes to allow another product to be entered.
If you are not adding more products, click either Publish or Save draft to close the Add a product page and go to your Product list, where the product you just added can be seen at the top the list.
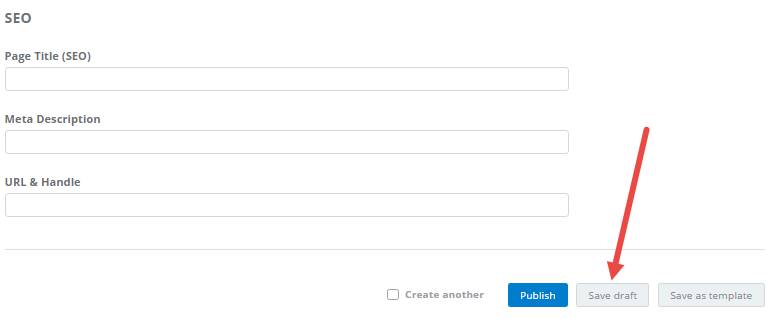
Options to create, publish, save draft, or save as template
The Difference between Publish and Save Draft
Publish finalizes the product and adds it to the appropriate collection or collections for display on your storefront. Save draft only saves a copy of the product, but does not display it or add it to the collection on your storefront.
Adding a Multi-Variant Product
In contrast to single variant products, multi-variant products are available in two or more variations.
- On your Admin panel, click Products>Add a Product. Alternatively, click Products>Product List, then click the Add a Product button on the topmost right.
- On the Add a product page, click Multi Variant.
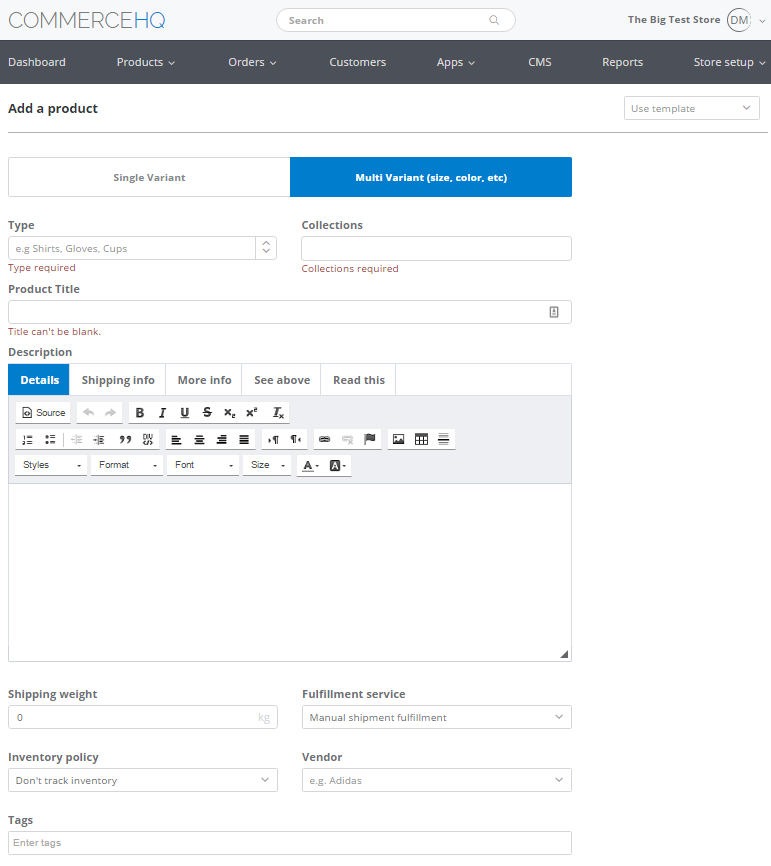
On the Add a Product page, click Multi Variant
- Enter a product type.
- Enter one or more collections to which the product will belong to when shown on your storefront. Products can be included in one or more collections. For more details, see Collections.
- Enter the product title and item price.
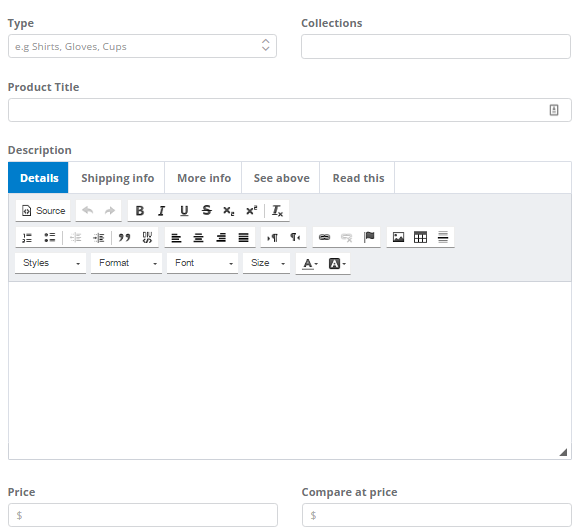
Enter the collection, product title and item price
- By default, fulfillment service is set to manual shipment fulfillment. You may change this to automatic shipment fulfillment, if desired.
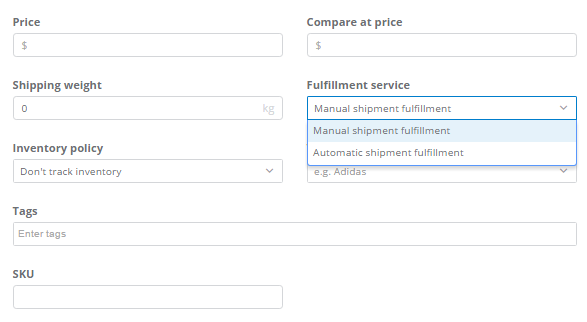
Select the fulfillment service
- By default, inventory policy is set to don't track inventory. You may change this to track inventory, if desired.

Select the inventory policy
- On the Variants section of the Add a Product page, enter your product variations. For more details, see Adding Product Variations.
- To help improve the product's SEO rankings, under the SEO section at the bottom of the Add a Product page, you can edit the page title, which defaults to the product title. You can also edit the URL and handle (which is automatically generated from the product title), and enter an optional meta description.
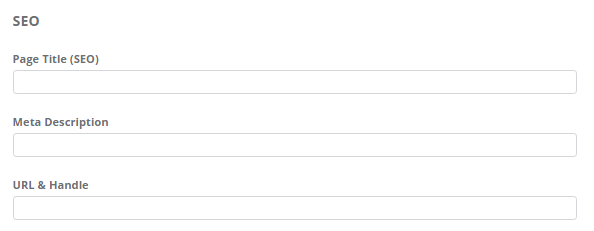
The SEO section of the Add a Product page
- Although the other fields are optional, we recommend that, at the very least, you enter a product description and upload product images to attract potential customers. Remember that the more your customers can visualize the actual product, the higher the chances of purchase.
The tabs under the Descriptions box are set up under Store setup>Product page. Use the rich text editor to format the text for the descriptions any way you want. You can even use HTML for your descriptions.
For more details on uploading images, see Uploading a Product Image.
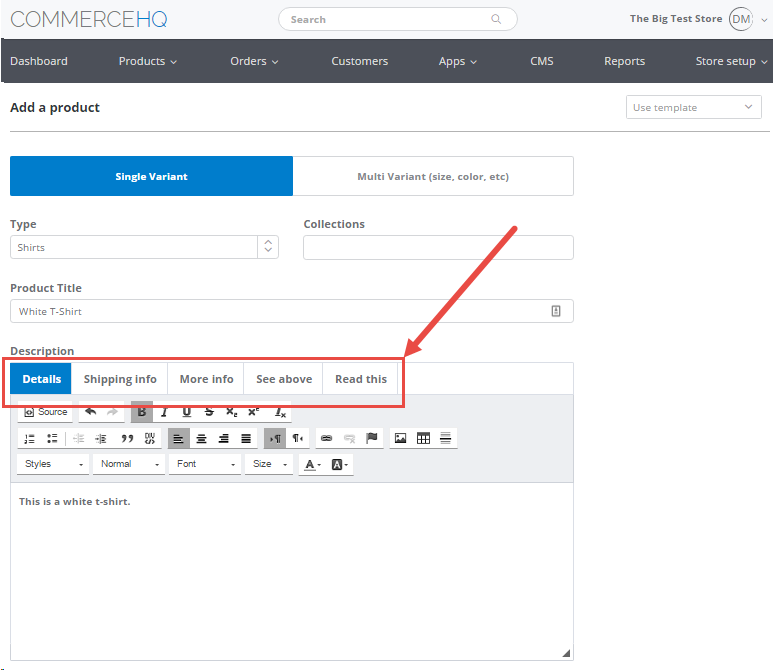
The various tabs under Descriptions are set up under Store Setup>Product page
Rich Text Editor for Product Descriptions
CommerceHQ features a rich text editor for entering your product descriptions on the Add a Product page. This allows you to be as creative as you like when entering your descriptions.
- If you are adding more products, check the Create another box, then click either Publish or Save draft to save your changes. A message appears after a successful save. The Add a product page then refreshes to allow another product to be entered.
If you are not adding more products, click either Publish or Save draft to close the Add a product page and go to your Product list, where the product you just added can be seen at the top the list.
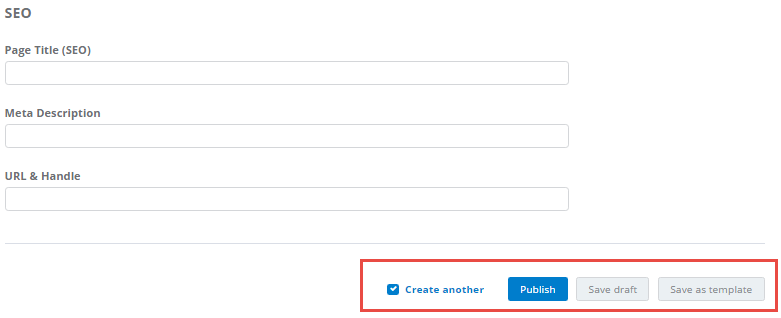
Options to create, publish, save draft, or save as template
The Difference between Publish and Save Draft
Publish finalizes the product and adds it to the appropriate collection or collections for display on your storefront. Save draft only saves a copy of the product, but does not display it or add it to the collection on your storefront.
Adding and Deleting Product Variations
To Add Product Variations
To Add a Product Option
To Delete a Product Option
To Add Product Variations
By default, there are two variant types, size and color, but you can add more variant types. For example, if you are selling t-shirts, you may want to add a design variant type for round-neck and v-neck t-shirts.
Product variations are entered through the Variants section of the Add a Product page.
For example,the procedure for adding a t-shirt that is available in two different color variations, black and white, and three different sizes, small, medium, and large goes like this:
- Under Color, enter black, and press Enter
- Still under Color, enter white, then press Enter.
- Under Size, enter small, medium, and large, pressing Enter between sizes, just like in the previous steps to add the black and white color variations.
The different variations are then displayed on a table just below the input fields. Note that since there are two sizes and three colors, the total number of variations is six.
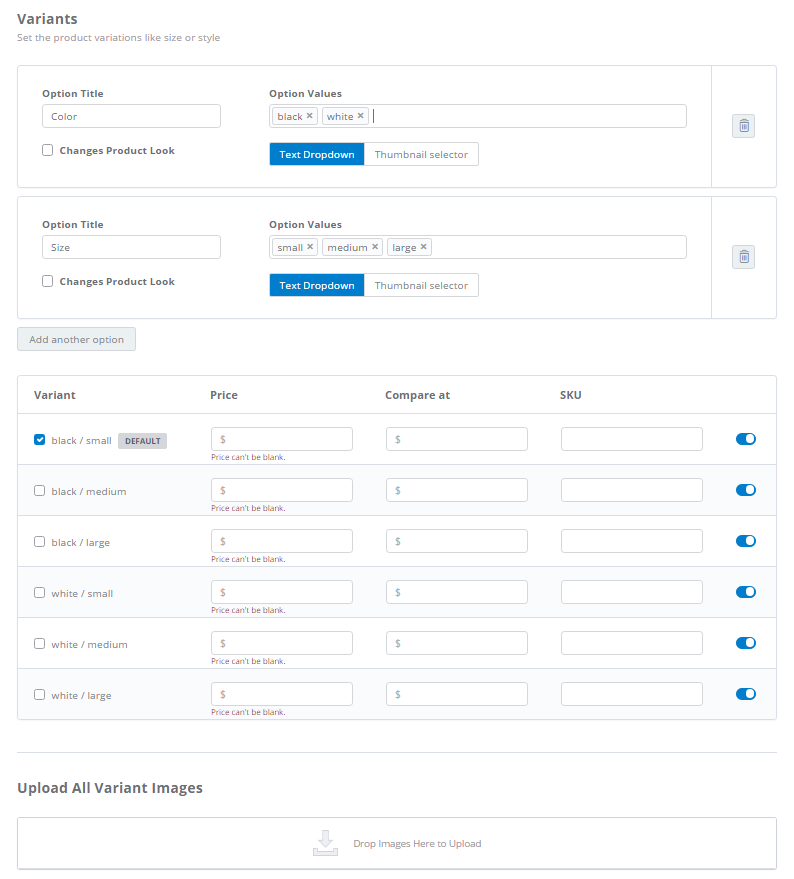
The Variants section of the Add a Product page
Important things to note about product variations:
- Checking the Changes Product Look box at the bottom of the Option Title means that the look of the product changes when a customer selects a variant. For example, if you have a Color option, if you have Black and White variations, the color of the product shown to the customer changes from Black to White when the customer selects the White color option.

The Changes Product Look box
- By default, Text Dropdown is enabled for each option value in a multi-variant product. This means that customers can select the variant through a listbox on your storefront.

The Text Dropdown selector
- Selecting Thumbnail Selector instead of Text Dropdown displays thumbnails of the product options instead. You have the option to add or edit thumbnails. Customers can select the variant by clicking on these thumbnails on your storefront.

The Thumbnail selector
- You can select a default variant to display on the Product page on your storefront. The first variant you add to your store automatically becomes the default variant. You can change this at any time by clicking the button to the left of the variant name.

Check the box on the left to designate a default variant
- A price for each variant is required.
- Both the price and compare at price have auto-fill buttons that appear when your cursor is on these fields. Clicking this auto-fill button will duplicate the value to the rest of the variants. When you hover your mouse over a button, a tooltip saying "Auto-Fill all Prices with this value" appears.

The Price column's auto-fill button
- You can enter an optional SKU that can be used to track your warehouse inventory. This is particularly useful when you have inventory policy set to Track Inventory.

Optional SKU for inventory tracking
- Each variant has an On/Off toggle on the rightmost. When you enter a variant, this is turned on by default, meaning that the variant is available for purchase. Turning off disables the variant, and prevents it from showing on your store.

To Add a Product Option
You can add a product option from the Variants section of the Add a Product page.
- On your Admin panel, click Products>Product List.
- On your Product List, click either the name of the product for which a product option is to be added, or the Edit button to the right of the product.
- On the Variants section of the Update a Product page, click the Add another option button on the left bottom.
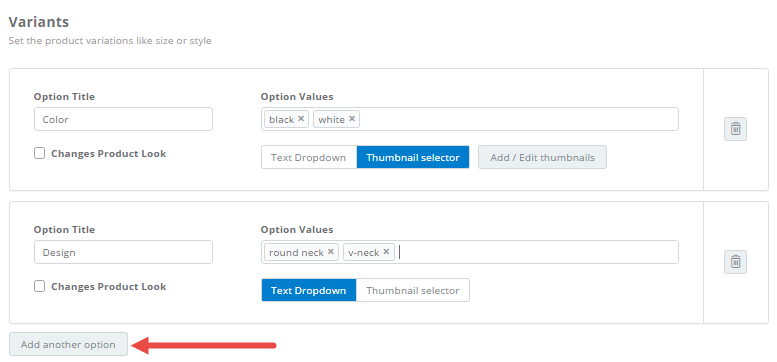
Click Add another option to add a variant type
- Enter the option title, then check the Changes Product Look box if you want the product to look different when a customer clicks it on your storefront.
- Enter the option values.
- By default, once published, your product's option values are displayed in a list box on your storefront, or a text dropdown. You can choose to change this to Thumbnail selector instead. This means that customers will be able to view thumbnails of the options instead.
- Optionally, click Add/Edit Thumbnails to display an Add/Edit Thumbnails window. By default, thumbnails are color-coded, e.g. if the color is blue, then the Hexadecimal value for blue is displayed. You can change this to a different color or upload a swatch image instead. To change this to a different color, enter the hexadecimal value of the color you want to use or click the swatch box.
Instead of a color-coded thumbnail, you can use a swatch image instead. To do this, click the Swatch Image button on the Add/Edit Thumbnails window, then either drop the image you want on the box or select it from your computer.
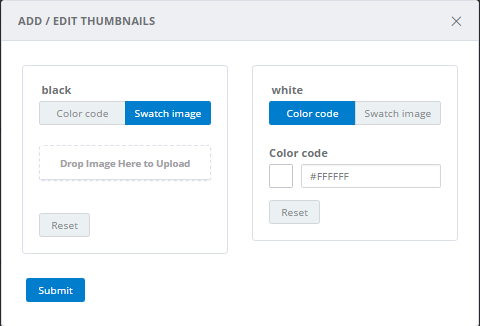
Use either a hexadecimal color code or swatch image for your thumbnails
- On the Add/Edit Thumbnails window, click Submit.
- Back on the Click Save.
To Delete a Product Option
You can delete a product option from the Variants section of the Add a Product page.
- On your Admin panel, click Products>Product List.
- On your Product List, click either the name of the product for which a product option is to be deleted, or the Edit button to the right of the product.
- On the Variants section of the Add a Product page, look for the variant type to be deleted, then click the Delete button to the right.
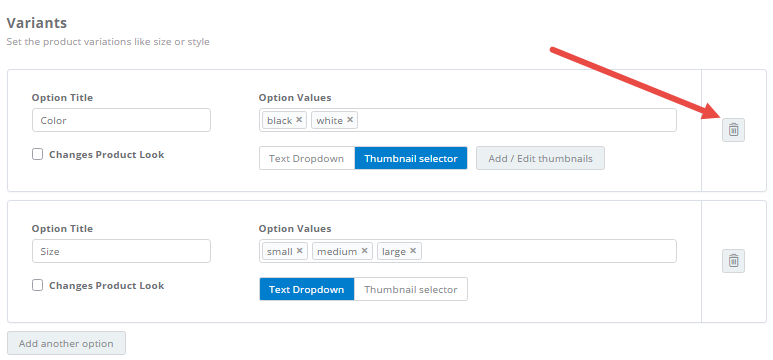
Click the Delete button to remove a variant type from a product
- Click Save.
Saving and Using a Product Template
The Add a Products page has a template feature that you can use to speed up data entry for your various products. For example, you might want to create separate templates for your single-variant and multi-variant products. This way, when you add a single-variant product, you just select the single-variant product template, and all the fields for the product get filled up with the data in your saved template.
To Save a Product Template
To Use a Product Template
To Save a Product Template
- Follow the steps for adding a single-variant or multi-variant product above (see Adding a Single-Variant Product and Adding a Multi-Variant Product, respectively).
- Click the Save as template button at the bottom-right, then enter a title for the template on the box that appears.
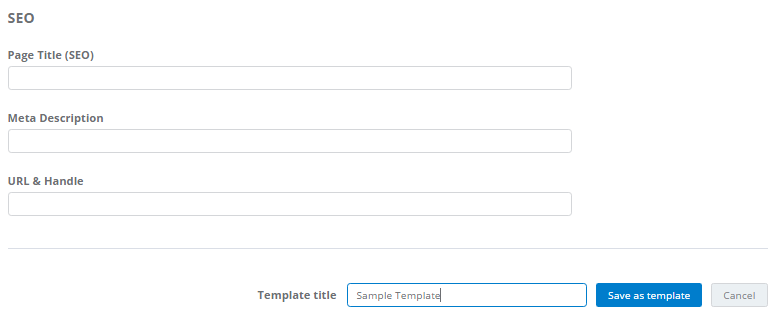
Enter a title, then click Save as template
- A notification message is displayed on the top of the Add a Product page, informing you that the template has been created. The rest of the fields on the Add a Product page remain untouched, and you can resume adding the product from where you left off, or you can cancel the operation altogether.
To Use a Product Template
- On your Admin panel, click Products>Add a Products. Alternatively, click Products>Product List, then click the Add a Product button on the topmost right.
- On the Add a product page, click the Use template box on the top right, then select a saved template from the list. The values on the saved template are then reflected on the product you are adding to your store. If you have already entered values in the product's various fields, these will be replaced by the values in the template.
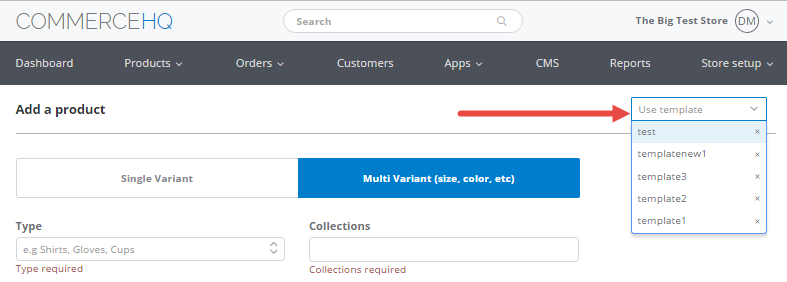
Select a template from the list
Uploading a Product Image
When browsing through your store, product images are the closest thing to the actual product that customers see, at least until they take delivery. Thus, it always helps to upload product images when adding products to your store.
To Upload a Product Image
To Delete a Product Image
To Upload a Product Image
- On the Add a product page, under the Upload Images section, click the Upload button, then select the image from your PC. You may upload as many images as you want.
Alternatively, you may drag-and-drop your product images onto the box.
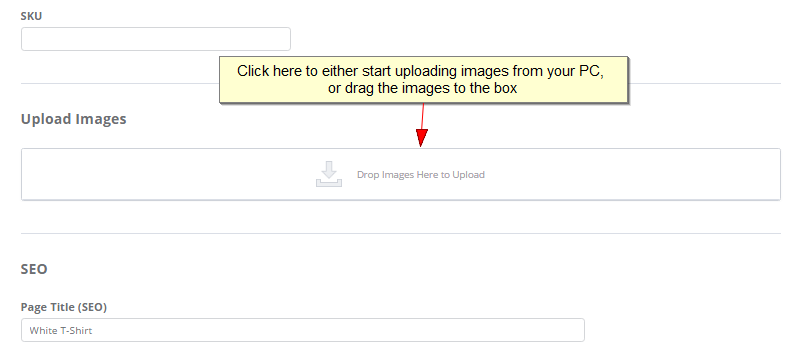
The Upload Images box
- Once the upload is completed, the images are displayed below the Upload button.

The uploaded images are displayed below the Upload button
To Delete a Product Image
On the Add a product page, under the Upload Images section, hover your mouse over the image you want to delete, then click the Trash icon that appears on the topmost-right.

Hover your mouse over the image, then click the Trash icon to delete
Filtering Products
By default, the Product List displays all your products, whether published or unpublished. The products are sorted by descending order. with the latest product entered showing first. You can apply a filter on the Product List to display only certain products.
To Filter Products
To Save a View
To Run a Saved View
To Filter Products
- On your Admin panel, click Products>Product List.
- To apply a filter on the list, click the All products link at the top.
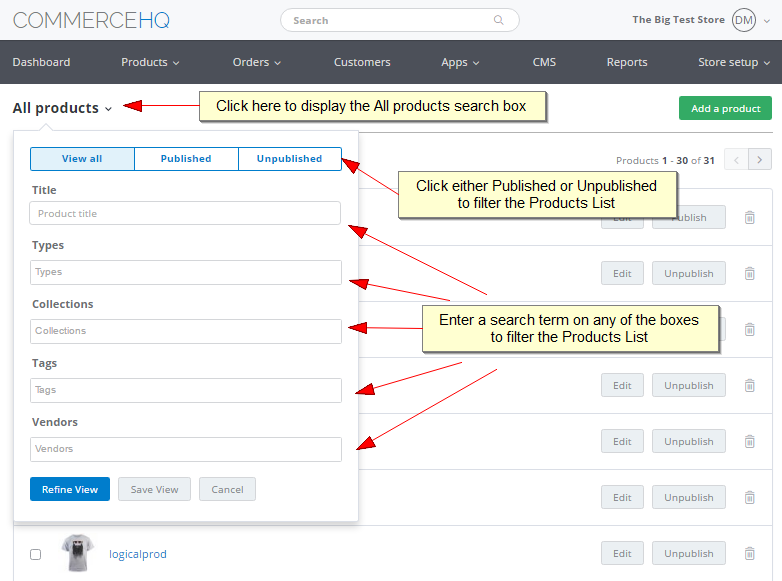
- Click either Published or Unpublished to filter the list by publish and unpublished products.
- Alternatively, you may filter by title, types, collections, tags, or vendors to narrow down your search. You may enter one or more terms in each of these fields.
- Click Refine View. The products that meet the filter criteria you entered in Step 4 above are then displayed on the screen.
To Save a View
Views of products to which filters have been applied can be saved. These saved views can then be used to filter the Product List in the future.
- Filter the Product List (see To Filter Products).
- Click Save View to add to your list of saved views.
To Run a Saved View
- Click the All Products link at the top of the Product List.
- Click a saved view from your list of saved views.
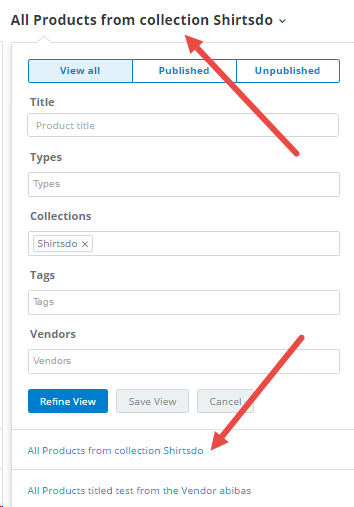
In the above example, clicking All Products from collection Shirtsdo on the Saved View list
applies the filter, and shows ONLY all products from collection Shirtsdo on the Product List..
Editing a Product
- On your Admin panel, click Products>Product List.
- On your Product List, click either the name of the product to be edited, or the Edit button to the right of the product.
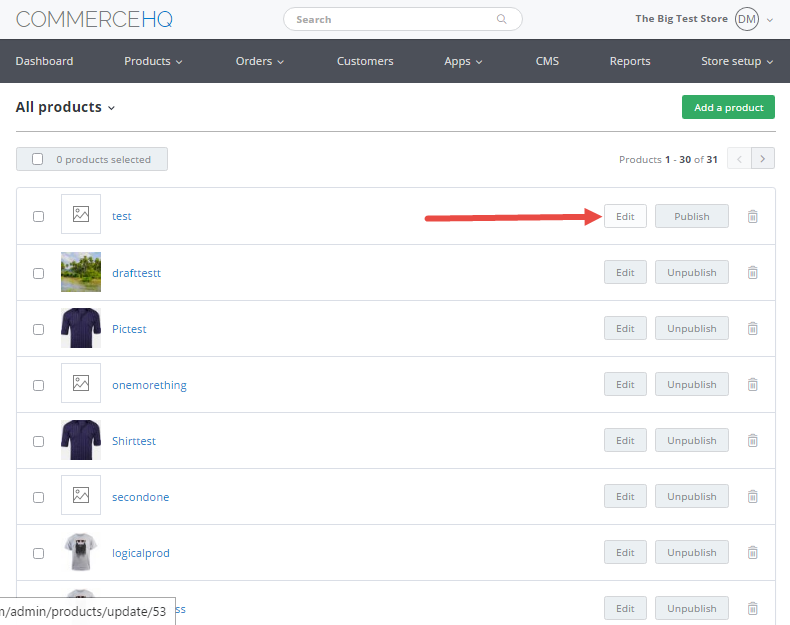
Click Edit to start changing the product details
- On the Update product page, make your changes to the product, then click Save.
Saving a Product as Draft
When adding a product, you can save it as a draft for editing later, or if you just want it to be ready for publication at the proper time. Saving as draft does not publish the product for display on your storefront.
To save a product as a draft, on the Add a Product page, after entering the details for the product, click the Save draft button.
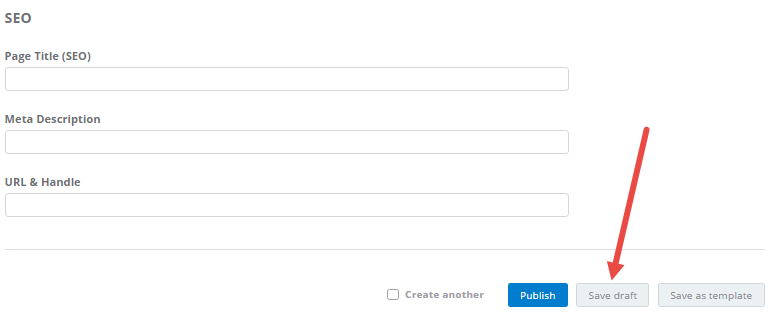
Click Save draft
You will know a product is a draft if you see a Publish button to the right of the product on your Product List.
To publish a draft product, see Publishing a Draft Product.
Publishing a Draft Product
Publishing a Single Draft Product
Publishing Multiple Draft Products
Publishing a Single Draft Product
When adding a product, clicking Save as Draft saves the product for later editing. You can publish draft products at any time.
- On your Admin panel, click Products>Product List.
- On your Product List, look for the draft product you want to publish. You will know a product is a draft if you see a Publish button to the right, in between the Edit and Delete buttons. Click the Publish button to publish the product to your storefront.
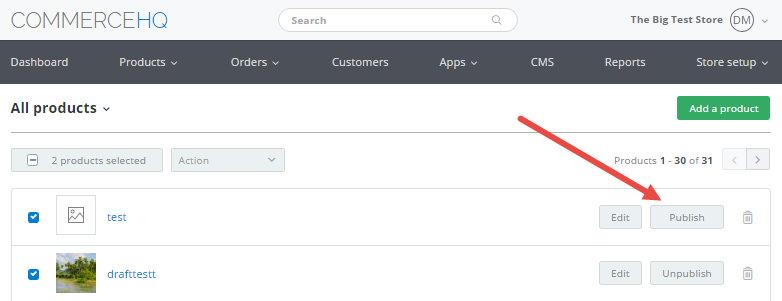
Click Publish to add the product to your store
Publishing Multiple Draft Products
- On your Product List, check the boxes to the right of the draft products you want to publish.
- On the top of the Product List, a box appears showing the number of products you selected in Step 1, together with an Actions box. Click the Actions box, then select Publish to publish the selected draft products to your storefront.
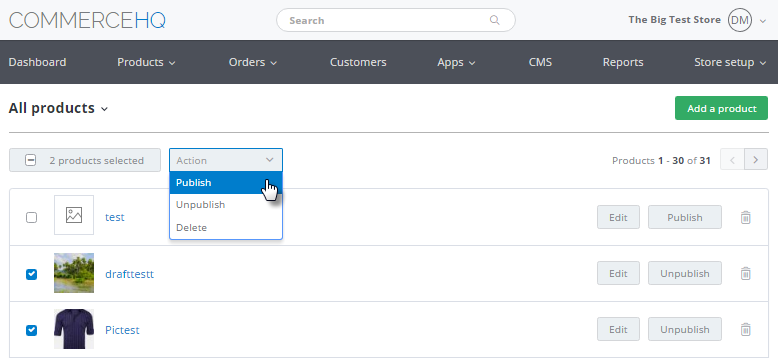
Select the products, then select Publish from the Actions box to add to your store
Unpublishing a Product
Products can be unpublished at any time. Unpublishing a product is less drastic than deleting it - you can publish the product sometime again in the future. The link to the product on your home page is removed, though, and the product page itself will no longer be visible to your customers, once it is unpublished.
Unpublishing a Single Product
Unpublishing Multiple Products
Unpublishing a Single Product
- On your Admin panel, click Products>Product List.
- On your Product List, look for the product to be unpublished, then click the Unpublish button to the right, in between the Edit and Delete buttons.
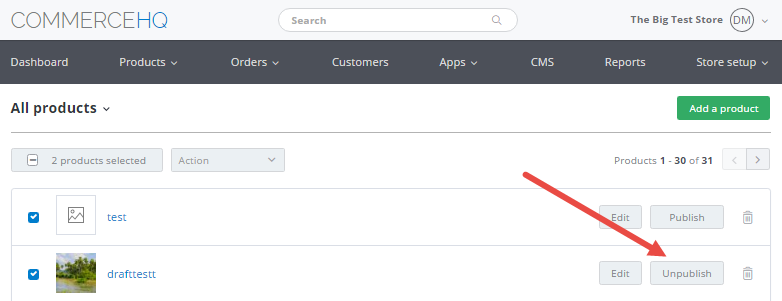
Click the Unpublish button
Unpublishing Multiple Products
- On your Product List, check the boxes to the right of the products you want to unpublish.
- On the top of the Product List, a box appears showing the number of products you selected in Step 1, together with an Actions box. Click the Actions box, then select Unpublish to remove the selected products from your storefront.
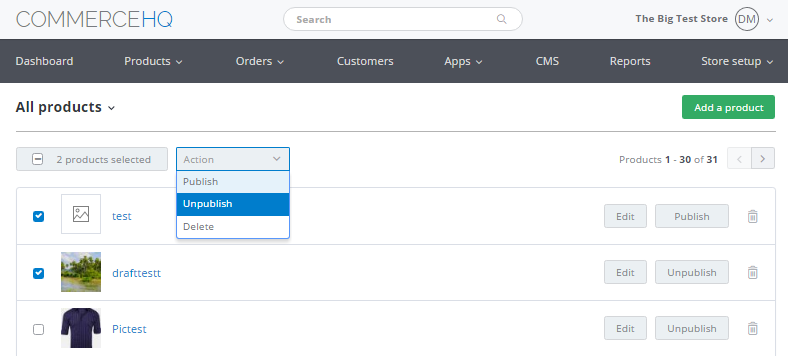
Select the products, then click Unpublish on the Actions box to temporarily remove from your store
The Difference between Unpublishing and Deleting
Unpublishing a product is temporarily removing the product from your store. On the other hand, deleting a product permanently removes the the product from your store.
Deleting a Product
You may delete products you no longer need, particularly if you do not see any further need for them in the future. Deleting a product removes the product permanently from your storefront. Both published and unpublished products can be deleted from your store.
Deleting a Single Product
Deleting Multiple Products
Deleting a Single Product
- On your Admin panel, click Products>Product List.
- On your Product List, click the Delete button to the right to delete the product.
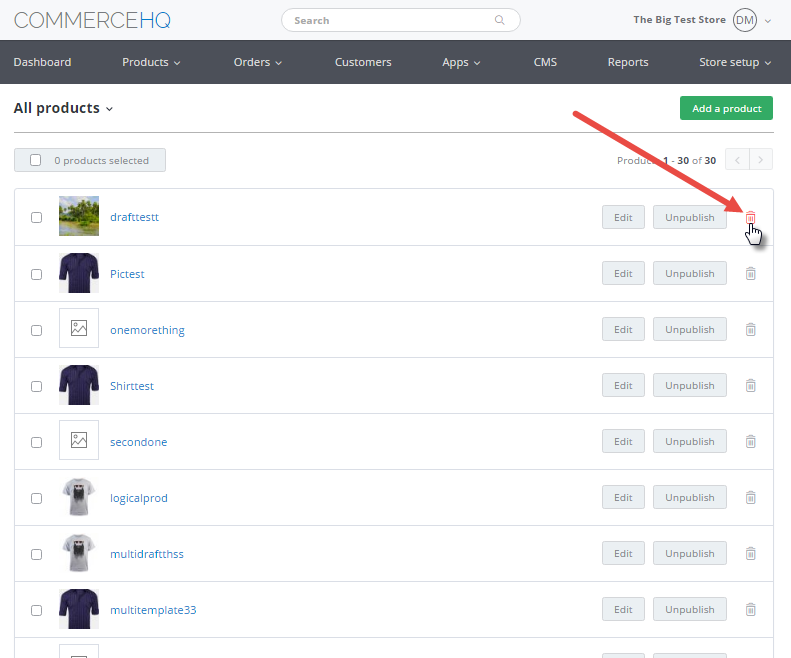
Click the Delete button to permanently remove the product from your store
Alternatively, you may delete a product right on the Edit product page. This is useful if you want to make sure that you are deleting the correct product.
- On your Product List, create Edit (for more details, see Editing a Product).
- On the Product Details page, click the Delete product button on the top right.
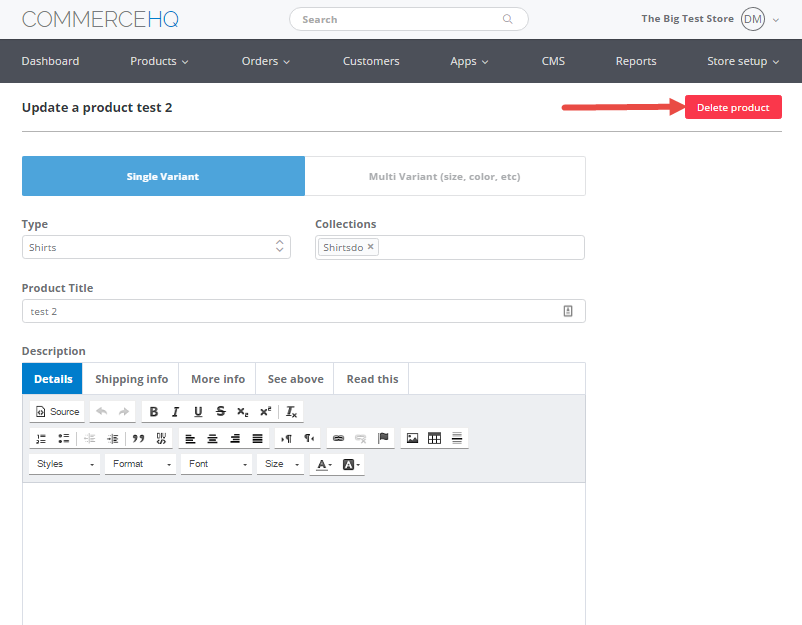
Click the Delete product button
Deleting Multiple Products
- On your Product List, check the boxes to the right of the products you want to delete.
- On the top of the Product List, a box appears showing the number of products you selected in Step 1, together with an Actions box. Click the Actions box, then select Delete to permanently remove the selected products from your storefront.
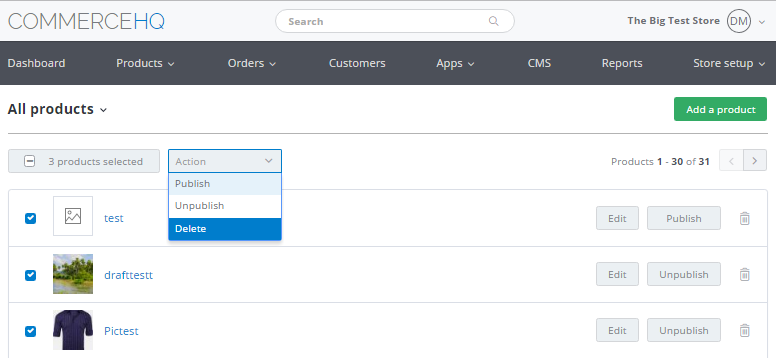
Select the products, then click Delete on the Actions box to permanently remove from your store
Updated almost 7 years ago
